Introduction
In this article, first, I’ll populate crypto database using Python and SQL. I retrieve the list of crypto coin assets, verify the data, and tackle any errors I encounter along the way. Second, I’ll talk about how to keep the database up to date with the latest prices, and retrieve daily data from the yahoo finance API. Third, a database for twitter data will be built as well. Finally, I’ll set up to build a web UI using FastAPI.
Crypto
What is cryptocurrency? Cryptocurrency is a form of payment that can be exchanged online for goods and services. Many companies have issued their own currencies, often called tokens, and these can be traded specifically for the good or service that the company provides. Think of them as you would arcade tokens or casino chips. You’ll need to exchange real currency for the cryptocurrency to access the good or service.
SQL
Before we jump into building a database for something, we need to clarify some general types of database activities in the basic SQL commands for them.
- Data Definition Language (DDL)
- CREATE: define a new table
- ALTER: change the types of records for a table
- DROP: remove a table
- Data Manipulation Language (DML)
- INSERT: add records to tables
- UPDATE: change part of a record
- DELETE: remove records from a table
- Data Query Language (DQL)
- SELECT: retrieve data
- Data Control Language (DCL)
- GRANT: give database privileges
- REVOKE: take away privileges
Initialise Database
At the very begining, I create a database file called “crypto.db”, by typing touch crypto.db in the command line. I want to crawl the crypto coin data on a daily basis, so I create a list which contains the crypto coin I want to keep up to date.
symbols = [
	'BTC-USD', 'ETH-USD', 'BNB-USD', 'DOGE-USD', 'USDT-USD',
	'LTC-USD', 'LINK-USD', 'USDC-USD', 'THETA-USD', 'XMR-USD'
]

cryptocurrencies = [
	'Bitcoin USD', 'Ethereum USD', 'Binance USD', 'Dogecoin USD', 'Tether USD',
	'Litecoin USD', 'Chainlink USD', 'USDCoin USD', 'ThETA USD', 'Monero USD'
]
Create Table
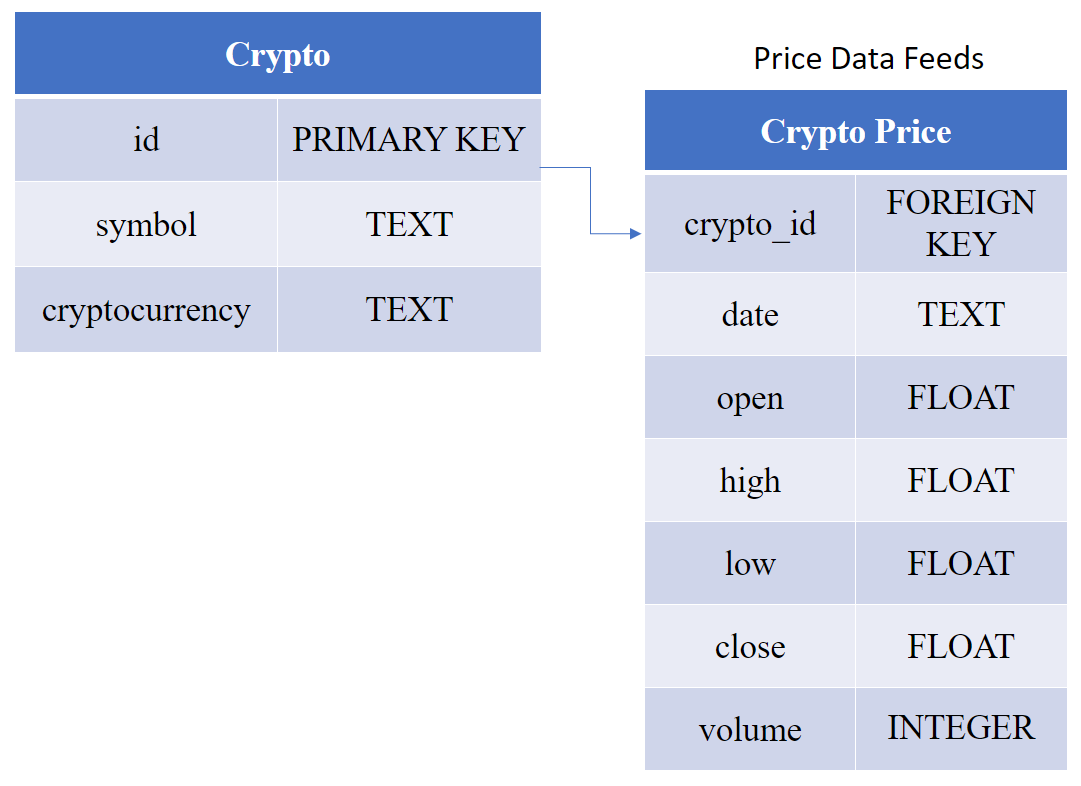
Next, I will create two tables, one for symbol mapping to name of cryptocurrency, another for prices information.
import sqlite3

def create_table():
	connection = sqlite3.connect('crypto.db')
	cursor = connection.cursor()
	cursor.execute("""
		CREATE TABLE IF NOT EXISTS crypto (
			id INTEGER PRIMARY KEY,
			symbol TEXT NOT NULL,
			cryptocurrency TEXT NOT NULL
		);
	""")
	cursor.execute("""
		CREATE TABLE IF NOT EXISTS crypto_price (
			id INTEGER PRIMARY KEY,
			crypto_id INTEGER,
			date NOT NULL,
			open NOT NULL,
			high NOT NULL,
			low NOT NULL,
			close NOT NULL,
			volume NOT NULL,
			FOREIGN KEY (crypto_id) REFERENCES crypto (id)
		);
	""")
	connection.commit()

create_table()
Insert Symbols into Table
After creating the two tables, I insert the symbol information into the table crypto.
def insert_into_table():
	connection = sqlite3.connect('crypto.db')
	cursor = connection.cursor()

	for symbol, cryptocurrency in zip(symbols, cryptocurrencies):
		# Insert values into table only if they don't exist in a row.
		cursor.execute("""
			INSERT INTO crypto (symbol, cryptocurrency)
			SELECT ?, ?
			WHERE NOT EXISTS (
				SELECT symbol, cryptocurrency FROM crypto WHERE symbol=? AND cryptocurrency=?
			);
		""", (symbol, cryptocurrency, symbol, cryptocurrency))
	connection.commit()

insert_into_table()
Drop Table
(Optional) If you want to drop the table and re-create a new list of different cryptocurrencies, then you can use the function below.
def drop_table():
	connection = sqlite3.connect("crypto.db")
	cursor = connection.cursor()
	cursor.execute("""
		DROP TABLE crypto_price;
	""")
	cursor.execute("""
		DROP TABLE crypto;
	""")
	connection.commit()
Populate Prices
I will retrieve daily price data from yahoo finance API and populate it into the pre-build table crypto_price in the database. This sets up to begin building a web UI in the next part.
Insert Prices into Table
In this section, I insert the prices information, which I get it from yahoo finance API, into the table crypto_price.
import yfinance as yf

def populate_prices():
	connection = sqlite3.connect("crypto.db")
	connection.row_factory = sqlite3.Row
	cursor = connection.cursor()
	cursor.execute("""
		SELECT * FROM crypto;
	""")
	rows = cursor.fetchall()
	symbols = [row['symbol'] for row in rows]
	cryptocurrencies = [row['cryptocurrency'] for row in rows]
	crypto_dict = {row['symbol']: row['id'] for row in rows}

	for symbol, cryptocurrency in zip(symbols, cryptocurrencies):
		print(f"Processing symbol {cryptocurrency}")
		df = yf.download(symbol, progress=False)
		df = df.reset_index(drop=False)
		df.columns = df.columns.str.lower()
		crypto_id = crypto_dict[symbol]
		for idx, row in df.iterrows():
			d = str(row["date"])
			o = row["open"]
			h = row["high"]
			l = row["low"]
			c = row["close"]
			v = row["volume"]
			cursor.execute("""
				INSERT INTO crypto_price (crypto_id, date, open, high, low, close, volume)
				SELECT ?, ?, ?, ?, ?, ?, ?
				WHERE NOT EXISTS (
					SELECT * FROM crypto_price
					WHERE crypto_id=? AND date=?
				);
			""", (crypto_id, d, o, h, l, c, v, crypto_id, d))
	connection.commit()
You can use DB Browser to check whether prices data is stored correctly.
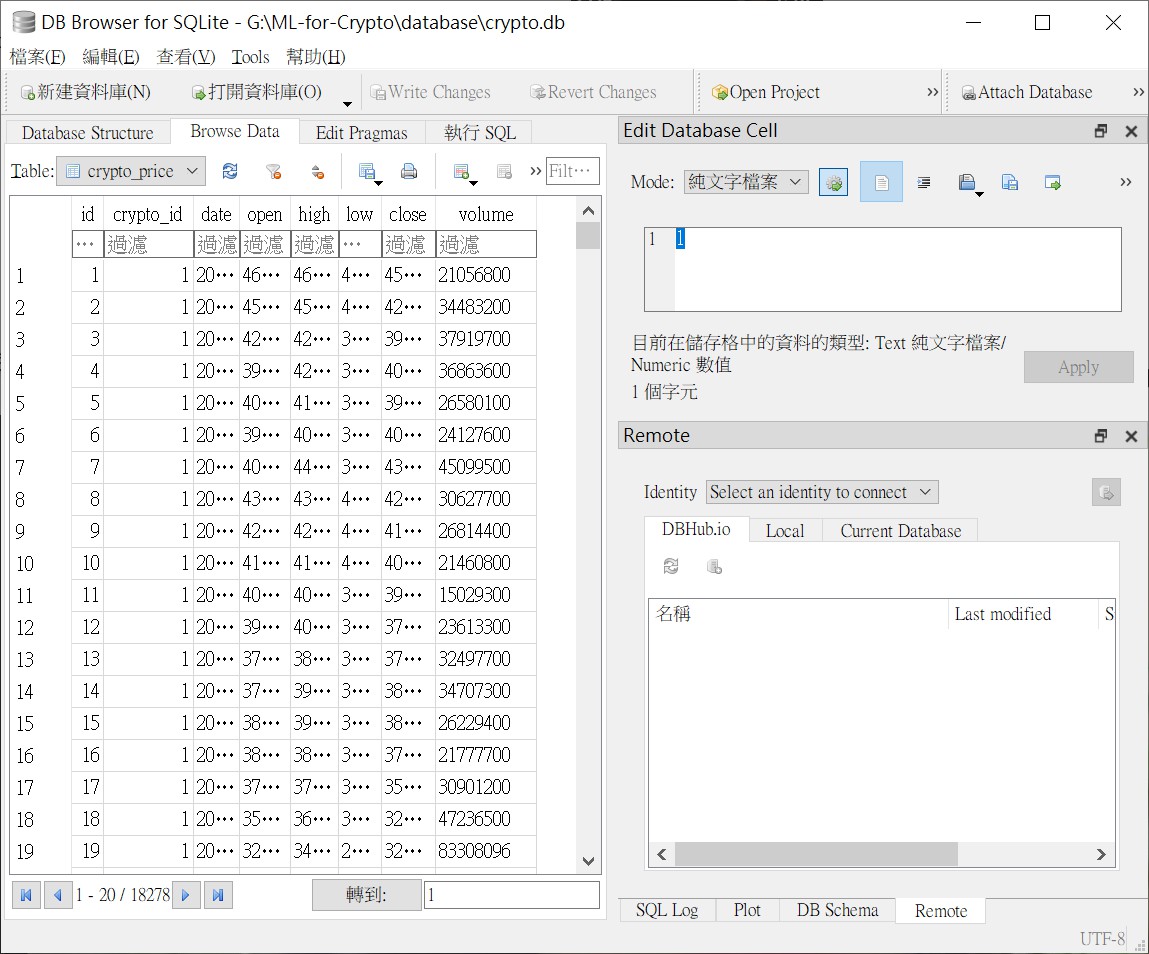
Or input sqlite3 crypto.db in command line , and check it through some SQL command.
SELECT * FROM crypto_priceWeb UI
In this section, I begin building a web frontend for the crypto coin price database. I cover the basics of FastAPI, a lightweight Python framework for buildings API’s and web applications. I use Semantic UI and jinja2 templates to quickly create a simple, but nice looking UI for our database.
FastAPI
The current folder and files should look like this:
G:.
|   app.py
|   crypto.db
|
+---templates
|       crypto_detail.html
|       index.html
|       layout.html
Create a file app.py with:
import sqlite3
from fastapi import FastAPI, Request
from fastapi.templating import Jinja2Templates
app = FastAPI()
templates = Jinja2Templates(directory="templates")


@app.get("/")
def index(request: Request):
    connection = sqlite3.connect("crypto.db")
    connection.row_factory = sqlite3.Row
    cursor = connection.cursor()
    cursor.execute("""
        SELECT * FROM crypto ORDER BY symbol;
    """)
    rows = cursor.fetchall()
    return templates.TemplateResponse(
        "index.html",
        {"request": request, "rows": rows})


@app.get("/crypto/{symbol}")
def crypto_detail(request: Request, symbol):
    connection = sqlite3.connect("crypto.db")
    connection.row_factory = sqlite3.Row
    cursor = connection.cursor()
    cursor.execute("""
        SELECT * FROM crypto WHERE symbol=?;
    """, (symbol, ))
    row = cursor.fetchone()

    cursor.execute("""
        SELECT * FROM crypto_price WHERE crypto_id=? ORDER BY date DESC
    """, (row['id'], ))
    bars = cursor.fetchall()

    return templates.TemplateResponse(
        "crypto_detail.html",
        {"request": request, "row": row, "bars": bars})
where layout.html is like the following
<!DOCTYPE html>
<html>
<head>
	<title>crypto</title>
	<link rel="stylesheet" href="https://cdn.jsdelivr.net/npm/semantic-ui@2.4.2/dist/semantic.min.css">
	<script src="https://cdn.jsdelivr.net/npm/semantic-ui@2.4.2/dist/semantic.min.js"></script>
</head>
<body>
	<div class="ui container">
		{% block content %}
		{% endblock %}
	</div>
</body>
</html>
and index.html is like the following
{% extends "layout.html" %}

{% block content %}
	<h1>Crypto List</h1>
	<table class="ui selectable striped table">
	  <thead>
	    <tr>
	      <th>Symbol</th>
	      <th>Coin</th>
	    </tr>
	  </thead>
	  <tbody>
	  	{% for row in rows %}
		    <tr>
		      <td>{{ row.symbol }}</td>
		      <td><a href="/crypto/{{ row.symbol }}">{{ row.cryptocurrency }}</a></td>
		    </tr>
	    {% endfor %}
	  </tbody>
	</table>
{% endblock %}
and crypto_detail.html is like the following
{% extends "layout.html" %}

{% block content %}

	<h1>
		<a href="/">
			Crypto
		</a>
		<i class="angle double right icon"></i>
		{{ row.cryptocurrency }} ({{ row.symbol }})
	</h1>

	<table class="ui selectable striped table">
	  <thead>
	    <tr>
	      <th>Date</th>
	      <th>Open</th>
	      <th>High</th>
	      <th>Low</th>
	      <th>Close</th>
	      <th>Volume</th>
	    </tr>
	  </thead>
	  <tbody>
	  	{% for bar in bars %}
		    <tr>
		      <td>{{ bar.date }}</td>
		      <td>{{ bar.open }}</td>
		      <td>{{ bar.high }}</td>
		      <td>{{ bar.low }}</td>
		      <td>{{ bar.close }}</td>
		      <td>{{ bar.volume }}</td>
		    </tr>
	    {% endfor %}
	  </tbody>
	</table>

{% endblock %}
Type in uvicorn app:app --reload, and open your browser at http://127.0.0.1:8000, then you can see the nice looking web UI.
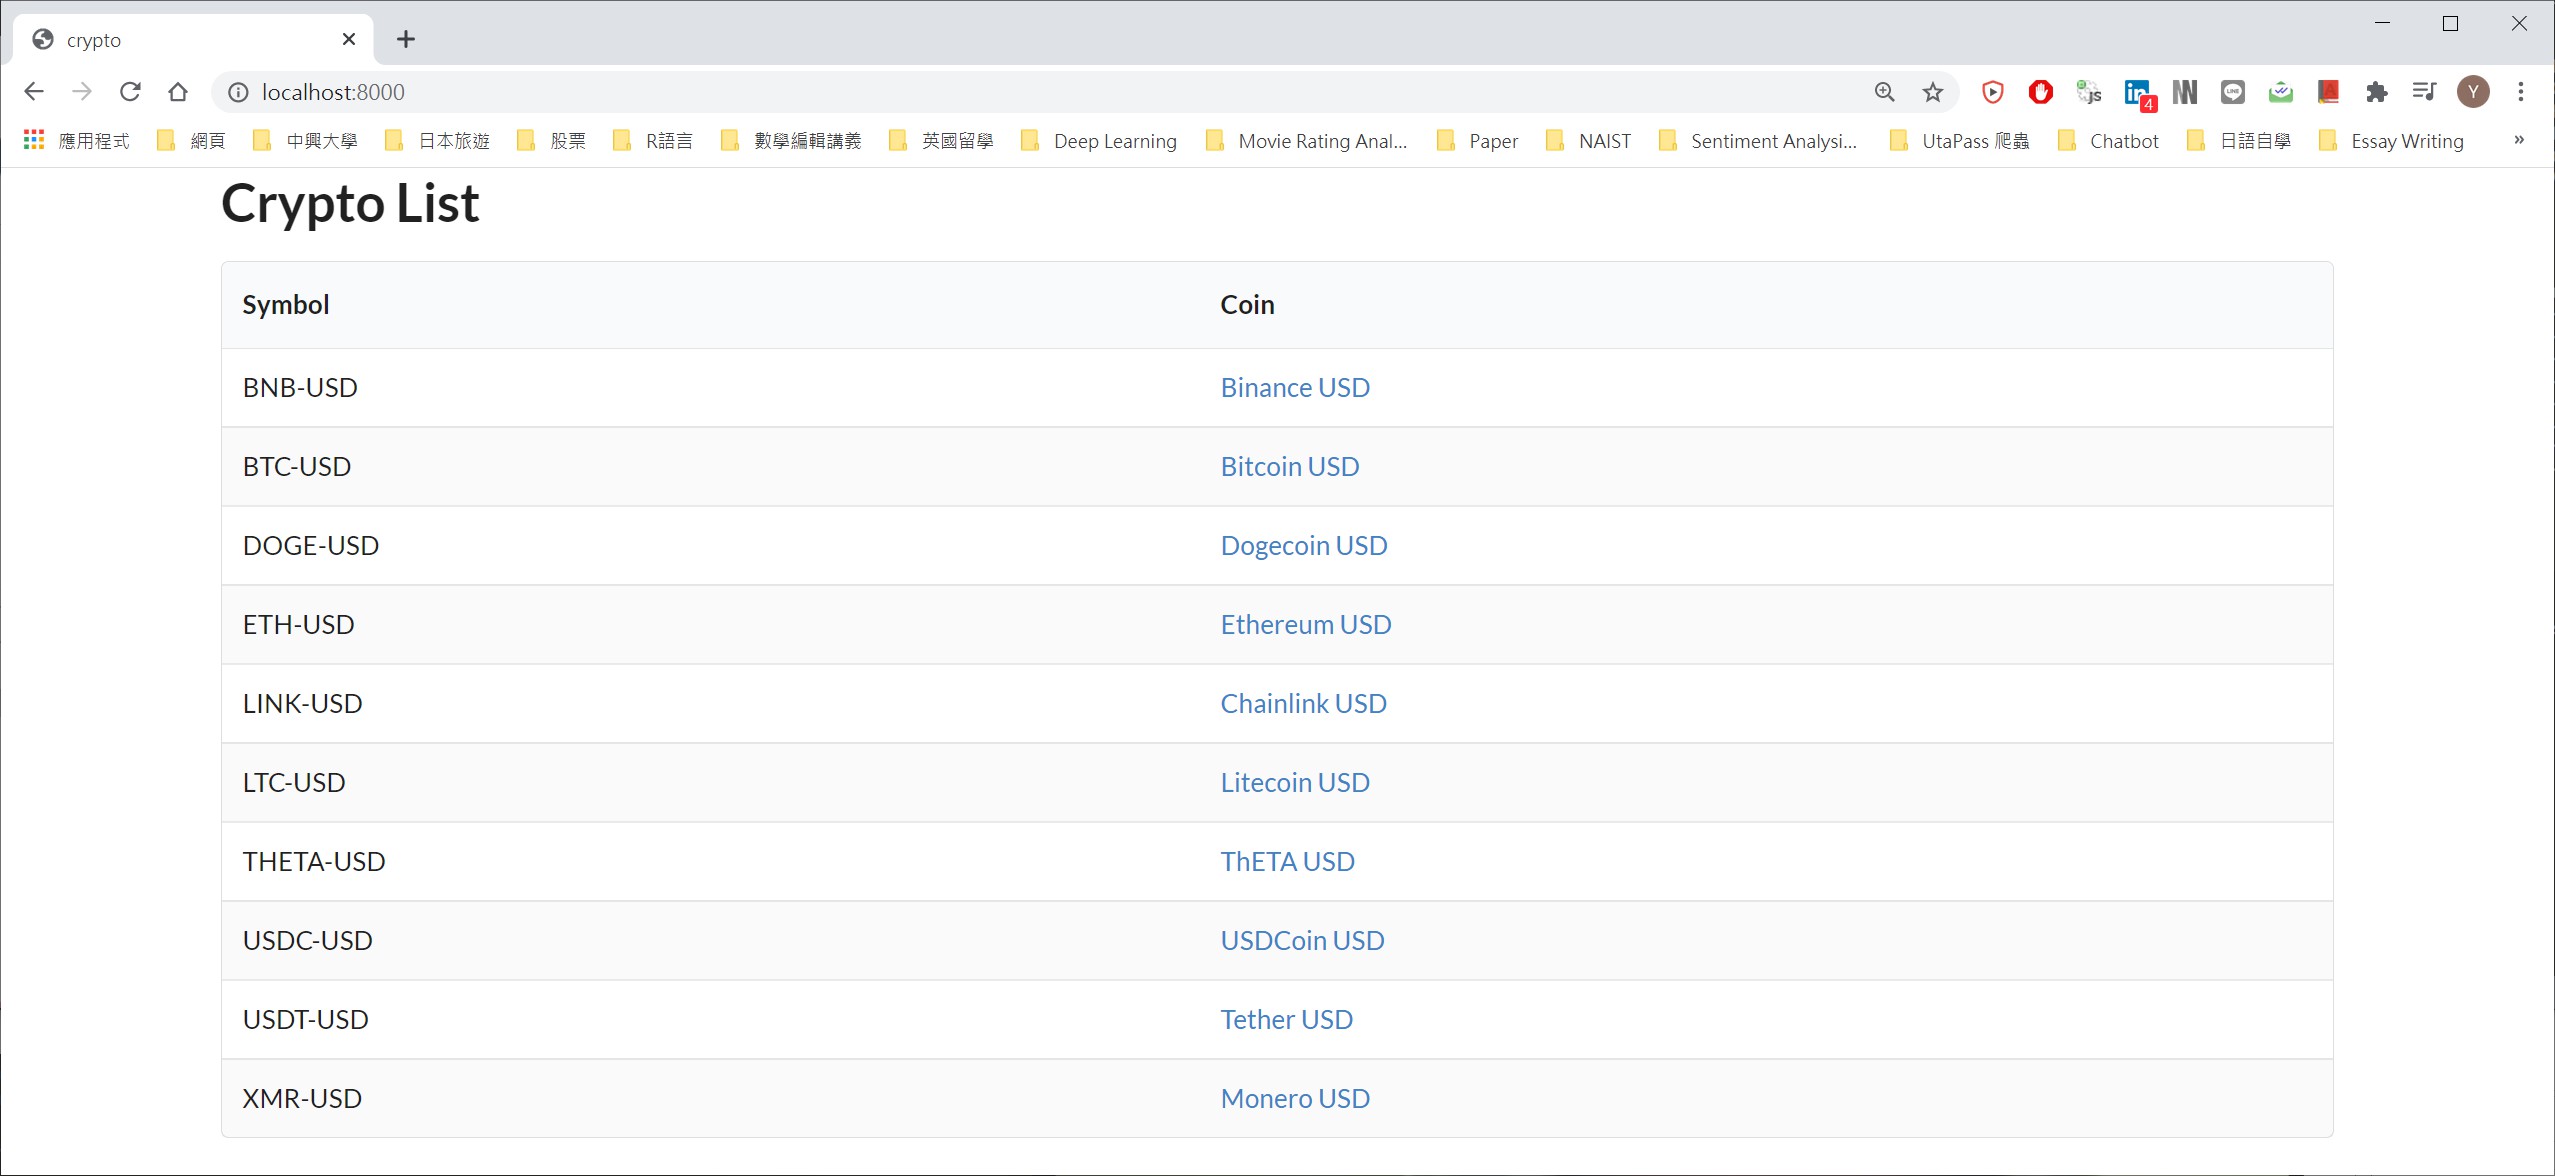
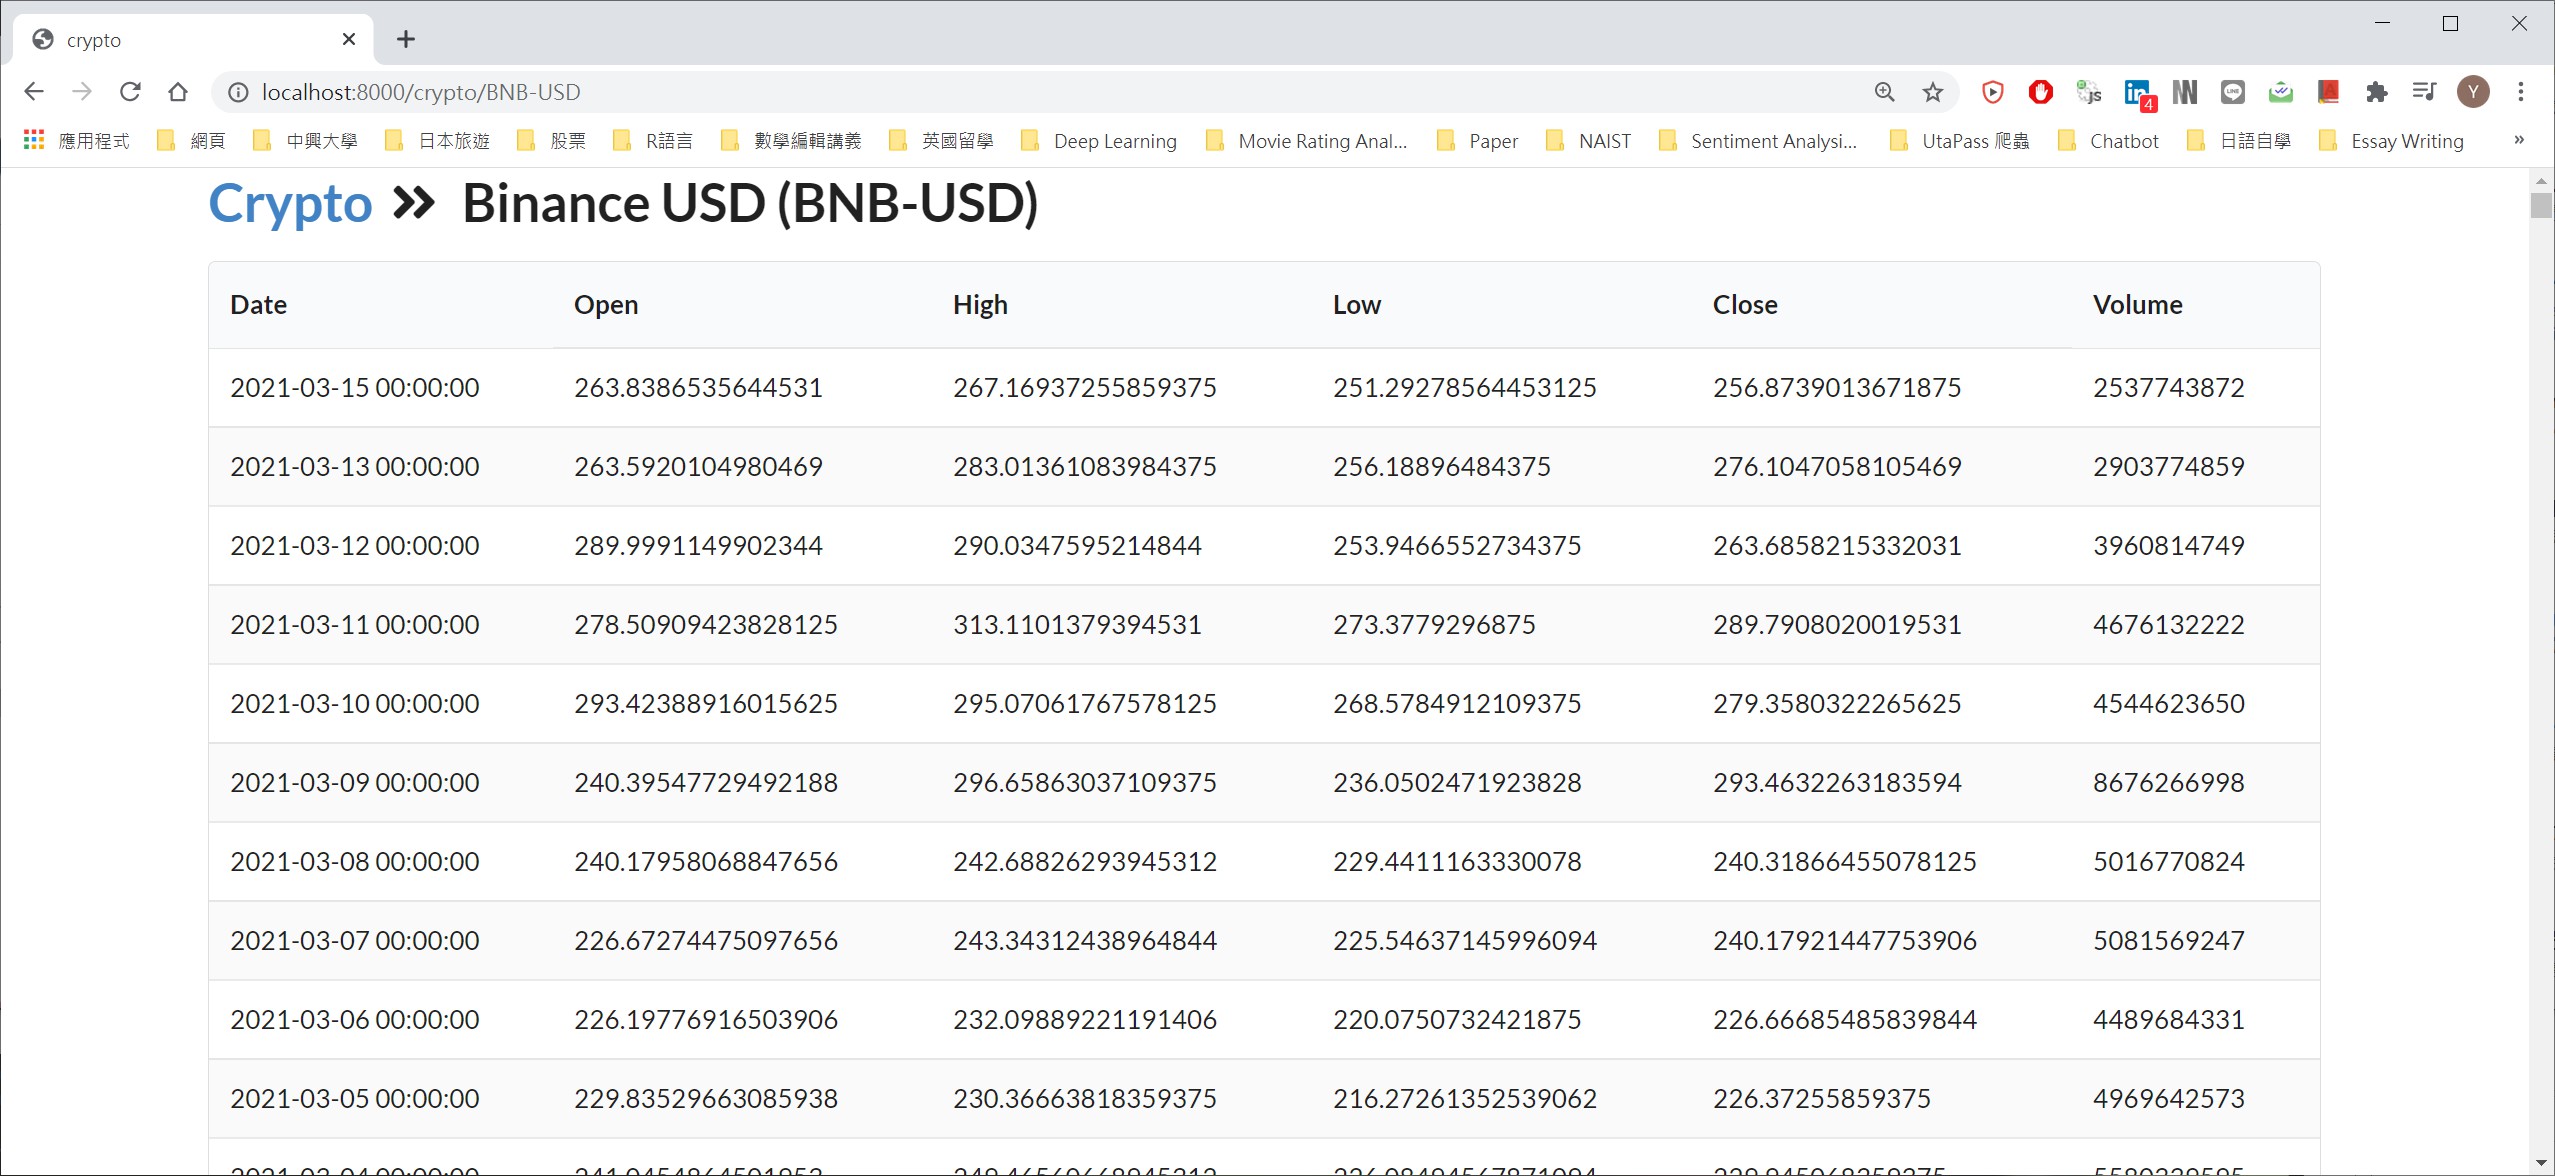
If you click on any symbol under the ‘Coin’ column, you can get to its detailed page.
Add Tradingview Chart
TradingView Advanced Chart Widget is a free and powerful charting solution that easily embeds into any website. Simply adjust the settings and click Apply to see a preview, then copy the embed code and paste it into your site code. You can personalize the chart by modifying the default symbol, watchlist, adding tools for technical analysis and a lot more. You can even add hotlists or an economic calendar to make the widget into an entire analytics platform.
You can get the embedding code over here. Next, put this into crypto_detail.html.
{% extends "layout.html" %}

{% block content %}

	<h1>
		<a href="/">
			Crypto
		</a>
		<i class="angle double right icon"></i>
		{{ row.cryptocurrency }} ({{ row.symbol }})
	</h1>

	<!-- TradingView Widget BEGIN -->
	<div class="tradingview-widget-container">
	  <div id="tradingview_05834"></div>
	  <div class="tradingview-widget-copyright"><a href="https://www.tradingview.com/symbols/NASDAQ-AAPL/" rel="noopener" target="_blank"><span class="blue-text">AAPL Chart</span></a> by TradingView</div>
	  <script type="text/javascript" src="https://s3.tradingview.com/tv.js"></script>
	  <script type="text/javascript">
	  new TradingView.widget(
	  {
	  "width": "100%",
	  "height": 610,
	  "symbol": "{{ ticker }}",
	  "interval": "D",
	  "timezone": "Europe/London",
	  "theme": "light",
	  "style": "1",
	  "locale": "en",
	  "toolbar_bg": "#f1f3f6",
	  "enable_publishing": false,
	  "allow_symbol_change": true,
	  "container_id": "tradingview_05834"
	}
	  );
	  </script>
	</div>
	<!-- TradingView Widget END -->

	<table class="ui selectable striped table">
	  <thead>
	    <tr>
	      <th>Date</th>
	      <th>Open</th>
	      <th>High</th>
	      <th>Low</th>
	      <th>Close</th>
	      <th>Volume</th>
	    </tr>
	  </thead>
	  <tbody>
	  	{% for bar in bars %}
		    <tr>
		      <td>{{ bar.date }}</td>
		      <td>{{ bar.open }}</td>
		      <td>{{ bar.high }}</td>
		      <td>{{ bar.low }}</td>
		      <td>{{ bar.close }}</td>
		      <td>{{ bar.volume }}</td>
		    </tr>
	    {% endfor %}
	  </tbody>
	</table>

{% endblock %}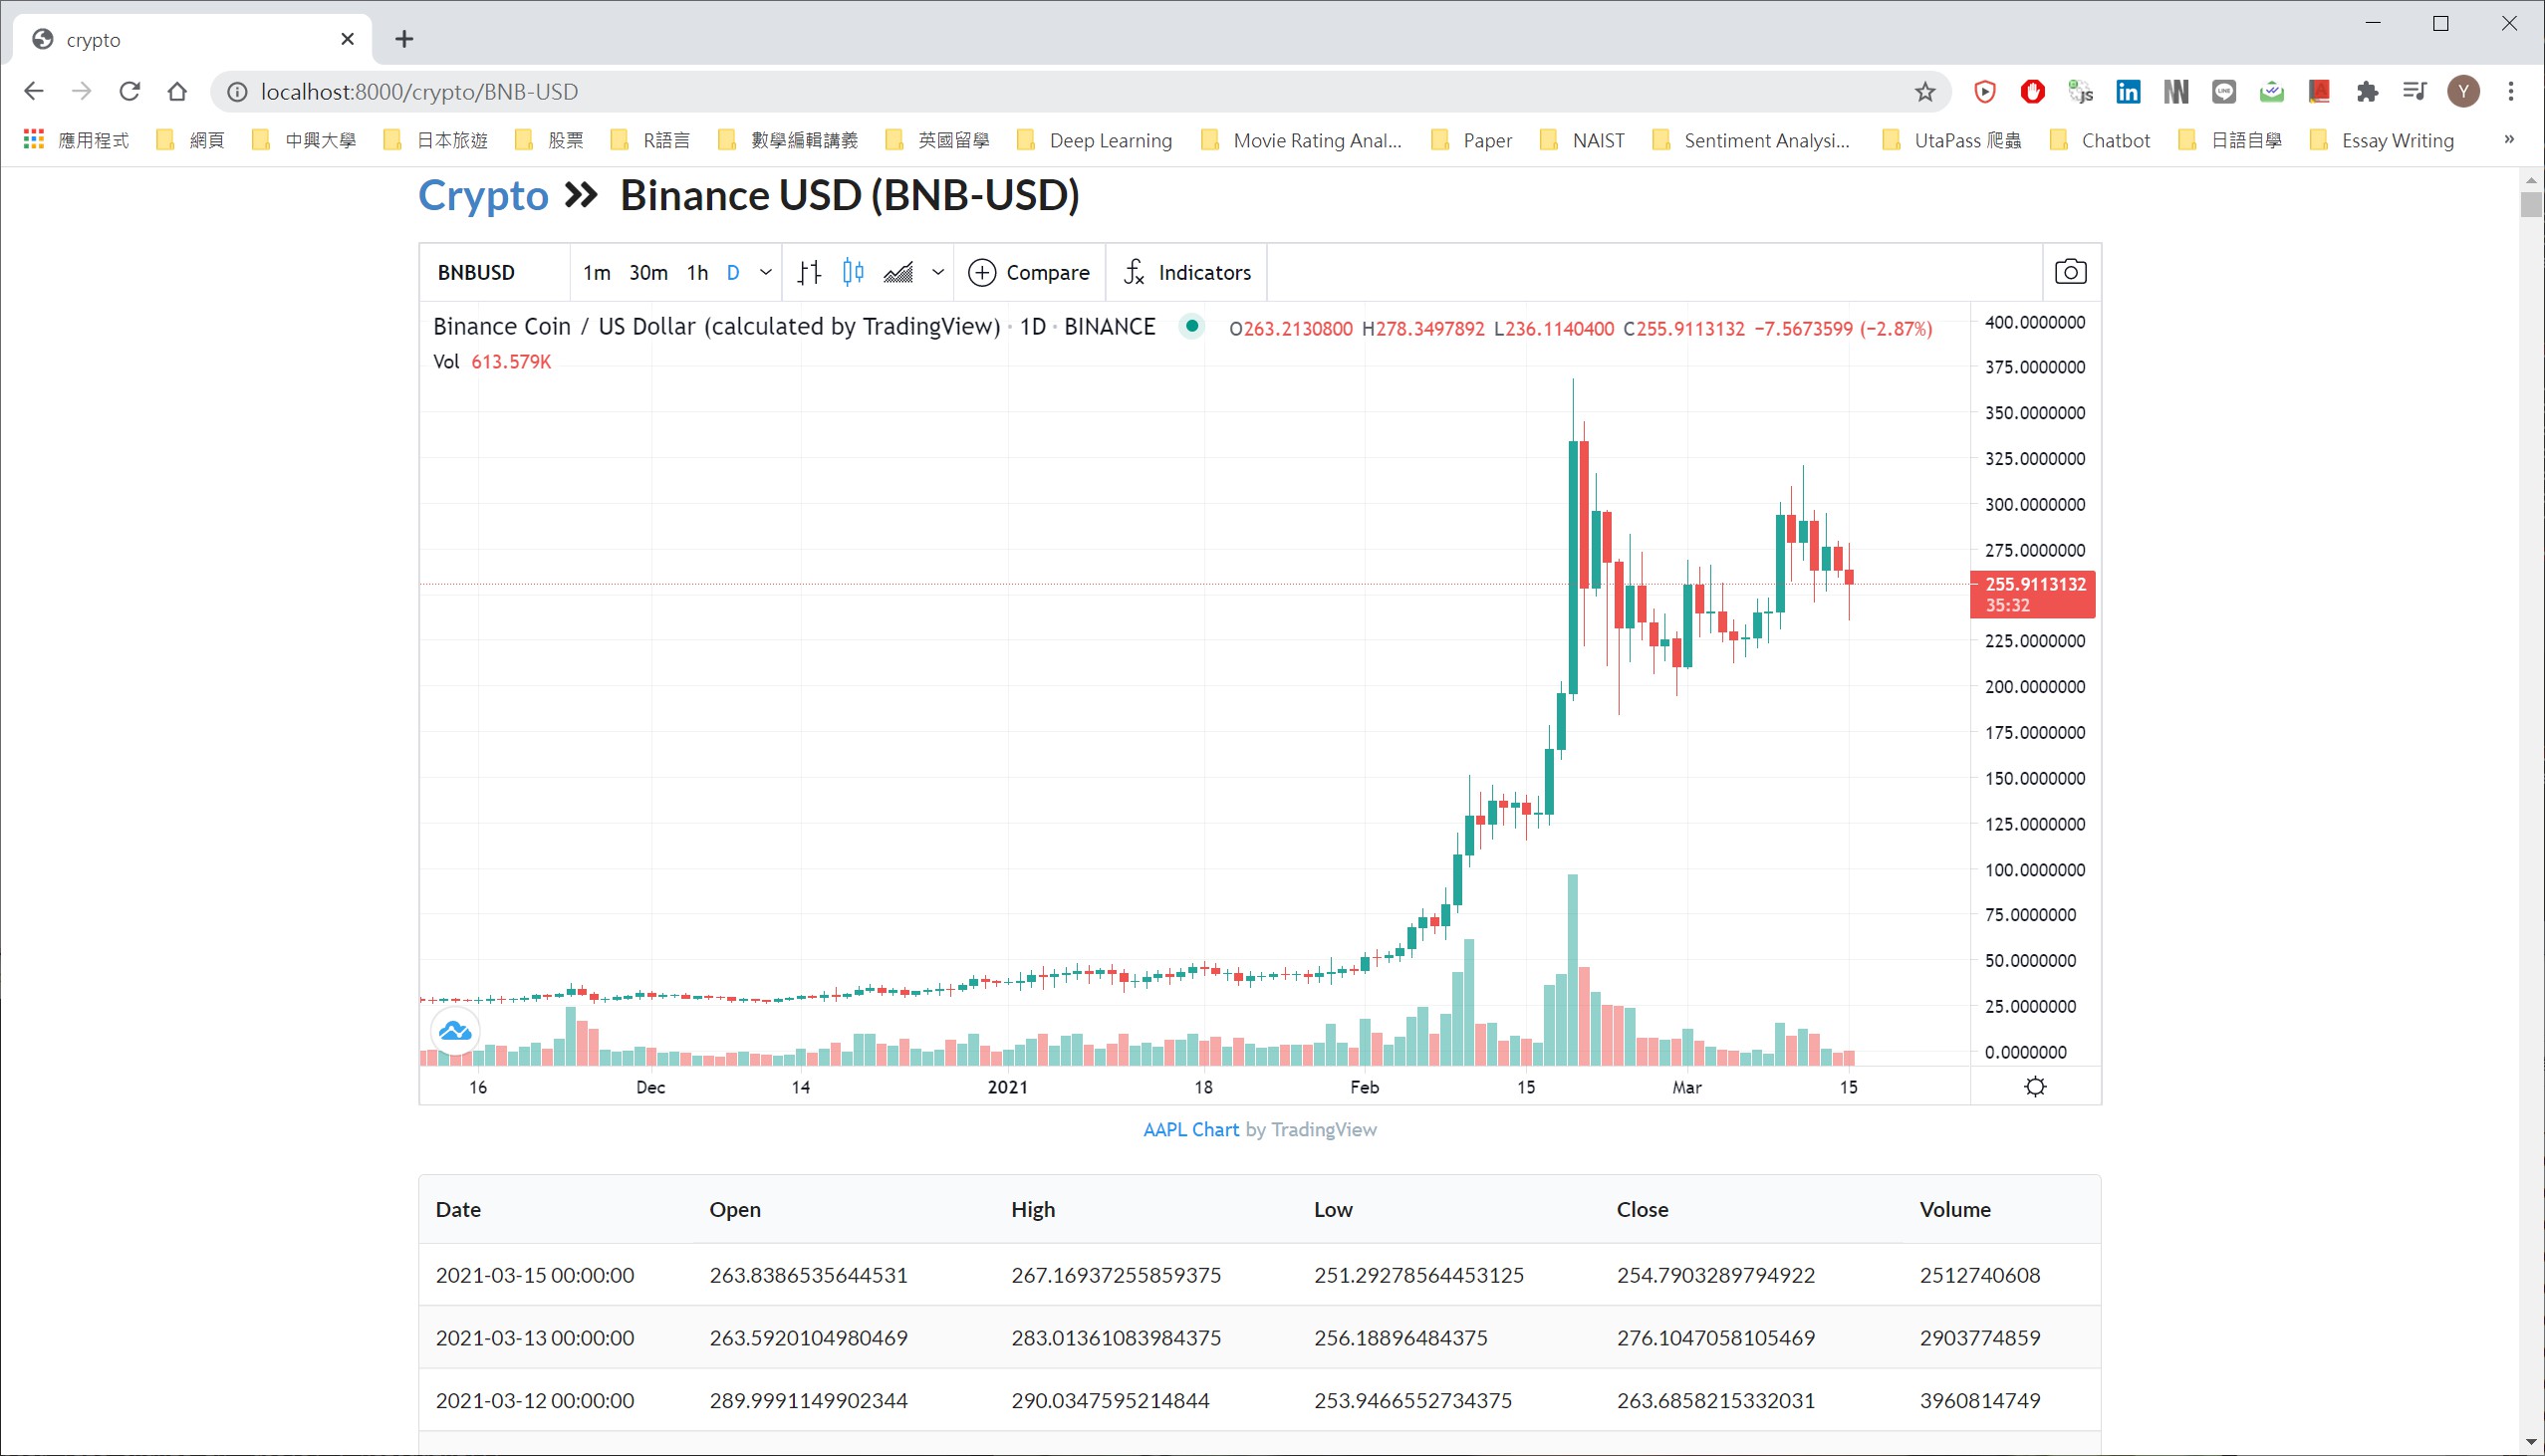
Twitter is many things. It is a special place to vent and share ideas in the form of memes and tweetstorms, diatribes and inquisitions. It contains a section to catch up on sports, worldwide events, breaking news — everything. So, I determine to scrape the data from the people to follow on crypto information on Twitter. Some user account I follow on is from this website.
Build the Index Page
There’ll be somewhere different in the home page, let’s change it a little bit in layout.html.
<!DOCTYPE html>
<html>
<head>
	<title>crypto</title>
	<link rel="stylesheet" href="https://cdn.jsdelivr.net/npm/semantic-ui@2.4.2/dist/semantic.min.css">
	<script src="https://cdn.jsdelivr.net/npm/semantic-ui@2.4.2/dist/semantic.min.js"></script>
	<script type="text/javascript">
		$('.ui .item').tab();
	</script>
	<script type="text/javascript">
	$(document).ready(function(){
	    $(document).on('click','.dropdown .item',function(e){
	        $('.ui .item').removeClass('active');
	        $(this).addClass('active');
	});
	});
	</script>
</head>
<body>
	<div class="ui secondary  menu">
	  <a href="/" class="item">
	    Crypto
	  </a>
	  <a href="/twitter" class="item">
	    Twitter
	  </a>
	  <a href="/news" class="item">
	    News
	  </a>
	  <div class="right menu">
	    <div class="item">
	      <div class="ui icon input">
	        <input type="text" placeholder="Search...">
	        <i class="search link icon"></i>
	      </div>
	    </div>
	    <a class="ui item">
	      Logout
	    </a>
	  </div>
	</div>
	<div class="ui container">
		{% block content %}
		{% endblock %}
	</div>
</body>
</html>
Build the Database Table
Below is the list of people I want to keep in the database.
usernames = [
	"binance", "VitalikButerin", "aantonop", "ethereumJoseph", "coinbase",
	"naval", "tayvano_", "NickSzabo4", "simondlr", "cburniske",
	"AmberBaldet", "koeppelmann", "jwolpert", "iam_preethi", "lrettig",
	"ricburton", "el33th4xor", "bcrypt", "evan_van_ness", "mikeraymcdonald",
	"FEhrsam", "laurashin", "AriDavidPaul", "avsa", "0xstark",
	"JohnLilic", "Disruptepreneur", "wheatpond", "leashless", "ethereum",
	"APompliano", "twobitidiot", "trentmc0", "Melt_Dem", "Bitcoin",
	"brian_armstrong", "nlw", "elonmusk", "DocumentingBTC", "BTCTN"
]
It’s basically the same to build a table for twitter data as previous.
def create_tweet_table():
	connection = sqlite3.connect('crypto.db')
	cursor = connection.cursor()
	cursor.execute("""
		CREATE TABLE IF NOT EXISTS twitter (
			id INTEGER PRIMARY KEY,
			username TEXT NOT NULL
		);
	""")
	cursor.execute("""
		CREATE TABLE IF NOT EXISTS twitter_tweet (
			id INTEGER PRIMARY KEY,
			username_id INTEGER,
			date NOT NULL,
			tweet TEXT NOT NULL,
			username TEXT NOT NULL,
			replies_count INTEGER NOT NULL,
			retweets_count INTEGER NOT NULL,
			likes_count INTEGER NULL,
			FOREIGN KEY (username_id) REFERENCES twitter (id)
		);
	""")
	connection.commit()


def insert_twitter_username_into_table():
	connection = sqlite3.connect('crypto.db')
	cursor = connection.cursor()

	for username in usernames:
		cursor.execute("""
			INSERT INTO twitter (username)
			SELECT ?
			WHERE NOT EXISTS (
				SELECT username FROM twitter WHERE username=?
			);
		""", (username, username))
	connection.commit()
Twint
Twint is an advanced Twitter scraping tool written in Python that allows for scraping Tweets from Twitter profiles without using Twitter’s API.
Twint utilizes Twitter’s search operators to let you scrape Tweets from specific users, scrape Tweets relating to certain topics, hashtags & trends, or sort out sensitive information from Tweets like e-mail and phone numbers.
Set up and Installation
It must be some challenge installing twint, I will guide you through this.
pip install --upgrade aiohttp_sockspip3 install --upgrade -e git+https://github.com/twintproject/twint.git@origin/master#egg=twint- In orser to solve
OSError: [WinError 87] The parameter is incorrect.please openoutput.pyin./src/twint/twintfirst. Make the following changes to fixes this issue:
Add (line#9):
import stringReplace (line#123):
word = ''
for i in output:
	if i in string.printable:
		word = word + i
print(word.replace('\n', ' '))
Populate Tweets into Database
Let’s start scraping tweets using twint, this may take a large amount of time the first time. For your information, you have to set initialise=True in insert_into_twitter_tweet_table() the first time to fetch all the tweets from each user account. After this, every time you re-scrape the tweets, you only have to set the delta parameter depends on the time period you want to crawl the twitter data. If you’re a MacOS user, you can use crontab with setting schedule using this website, and if you’re a windows user, you can use the built-in Task Scheduler. If you don’t want to use Task Scheduler, you can use the Windows Subsystem for Linux which will allow you to use cron jobs like on Linux.
import os
import sqlite3
import pandas as pd
from datetime import timedelta
from datetime import date as dt


def scrape_tweet(username, since="2012-01-01"):
	os.system(f"twint -u {username} --since {since} -o file.csv --csv")
	df = pd.read_csv("file.csv", sep="\t")
	df = df[[
		"date", "id", "username", "tweet", "replies_count",
		"retweets_count", "likes_count"
	]]
	df.columns = [
		"date", "tweet_id", "username", "tweet",
		"replies_count", "retweets_count", "likes_count"
	]
	os.system("rm file.csv")
	return df


def insert_into_twitter_tweet_table(initialise=False, delta=1):
	connection = sqlite3.connect("crypto.db")
	connection.row_factory = sqlite3.Row
	cursor = connection.cursor()
	cursor.execute("""
		SELECT * FROM twitter;
	""")
	rows = cursor.fetchall()
	usernames = [row['username'] for row in rows]
	username_dict = {row['username']: row['id'] for row in rows}
	# print(username_dict)

	for username in usernames:
		print(f"Processing {username}")
		if initialise:
			df = scrape_tweet(username)
			df = df.reset_index(drop=True)
			df.columns = df.columns.str.lower()
		else:
			try:
				selected_date = dt.today() - timedelta(days=delta)
				selected_date.isoformat()
				df = scrape_tweet(username, since=selected_date)
				df = df.reset_index(drop=True)
				df.columns = df.columns.str.lower()
			except:
				continue
		username_id = username_dict[username]
		for idx, row in df.iterrows():
			i = username_id
			d = str(row["date"])
			tw = row["tweet"]
			un = row["username"]
			re = row["replies_count"]
			rt = row["retweets_count"]
			lc = row['likes_count']
			cursor.execute("""
				INSERT INTO twitter_tweet (
					username_id, date, tweet, username,
					replies_count, retweets_count, likes_count
				)
				SELECT ?, ?, ?, ?, ?, ?, ?
				WHERE NOT EXISTS (
					SELECT * FROM twitter_tweet
					WHERE date=? AND tweet=?
				);
			""", (i, d, tw, un, re, rt, lc, d, tw))
	connection.commit()
Build Font-end Page
Do the thing which we did in previous. Build the html page for twitter data related to each user account, and put these html file in templates folder.
First, create a html file called twitter_index.html.
{% extends "layout.html" %}

{% block content %}
	<h1>Twitter User List</h1>
	<table class="ui selectable striped table">
	  <thead>
	    <tr>
	      <th>Username</th>
	    </tr>
	  </thead>
	  <tbody>
	  	{% for row in rows %}
		    <tr>
		      <td><a href="/twitter/{{ row.username }}">{{ row.username }}</a></td>
		    </tr>
	    {% endfor %}
	  </tbody>
	</table>
{% endblock %}
Next, create a html file called twitter_detail.html.
{% extends "layout.html" %}

{% block content %}
	<h1>Twitter</h1>
	<table class="ui selectable striped table">
	  <thead>
	    <tr>
	      <th>Date</th>
	      <th>Tweet</th>
	      <th># of Replies</th>
	      <th># of Retweets</th>
	      <th># of Likes</th>
	    </tr>
	  </thead>
	  <tbody>
	  	{% for tweet in tweets %}
		    <tr>
		      <td>{{ tweet.date }}</td>
		      <td>{{ tweet.tweet }}</td>
		      <td>{{ tweet.replies_count }}</td>
		      <td>{{ tweet.retweets_count }}</td>
		      <td>{{ tweet.likes_count }}</td>
		    </tr>
	    {% endfor %}
	  </tbody>
	</table>
{% endblock %}
Finally, add twitter_index() and twitter_detail() in app.py file.
@app.get("/twitter")
def twitter_index(request: Request):
    connection = sqlite3.connect("crypto.db")
    connection.row_factory = sqlite3.Row
    cursor = connection.cursor()
    cursor.execute("""
        SELECT * FROM twitter ORDER BY username;
    """)
    rows = cursor.fetchall()
    return templates.TemplateResponse(
        "twitter_index.html",
        {"request": request, "rows": rows})

@app.get("/twitter/{name}")
def twitter_detail(request: Request, name):
    connection = sqlite3.connect("crypto.db")
    connection.row_factory = sqlite3.Row
    cursor = connection.cursor()
    print(name)
    cursor.execute("""
        SELECT * FROM twitter WHERE username=?;
    """, (name, ))
    row = cursor.fetchone()

    cursor.execute("""
        SELECT * FROM twitter_tweet WHERE username_id=? ORDER BY date DESC
    """, (row['id'], ))
    tweets = cursor.fetchall()

    return templates.TemplateResponse(
        "twitter_detail.html",
        {"request": request, "row": row, "tweets": tweets})
Voila!
Conclusion
I’ve done implementing a very simple crypto web app using FastAPI, so that we can check on it efficiently and effectively. Have fun!